在上篇中我们实现了DataPager的扩展,本文我们的目标则是ComboBox,标题的“扩展”两个字在本文稍有不适,因为对DataPager我们确实是扩展了它的外观和功能,而对于ComboBox,我们要做的事情可能用“改变”这个词更加恰当。
好了,来看看我们准备对ComboBox做些什么。Microsoft为我们提供的ComboBox简单好用,当然简单好用的另外一个意思就是在有些场合它就会显得很笨,在网上搜索一下ComboBox,比较常见的问题都是ComboBox下拉框带自定义控件有关的,尤其是带TreeView的,有一些不错的解决方案,今天我们完成扩展的第二个实例,换一个角度实现一个树状下拉框的ComboBox,不改动ContrlTemplate也不使用UserControl拼装,就使用DependencyPropertyWatcher。
ComboBox有方便快捷的SelectedValuePath和DisplayMemberPath,也有灵活的ItemTemplate,ItemTemplate几乎无所不能,但是之所有有几乎两字,一旦我们为ComboBox设置了ItemTemplate,那么SelectedItem也套用了ItemTemplate。然而在非常多的场合,我们希望在下拉框中显示对象的各种详细信息,而在被选择之后只显示关键信息,比如一个ComboBox中如果填充了一张客户列表,那么下拉框展开之时能除了看到客户名称还有联系人和联系方式会让我们感觉使用得舒服,但是如果选择了一个客户之后,我们一般希望仅仅显示客户的名称就足够了,或者说我们希望呈现的是另外一种合理的重新被组织过的信息,简而言之,在DisplayMemberPath之外,我们需要一个独立的SelectionDisplayMemberPath,在ItemTemplate之外,我们需要一个独立的SelectionItemTemplate,当然SelectionDisplayMemberPath的适用性非常小,因为它仅仅是一个简单的Path设置,而SelectionItemTemplate却真正能为我们解决问题的方案,接下来我们就来实现它。
和DataPager一样,我们还是先看看ComboBox的ControlTemplate定义:
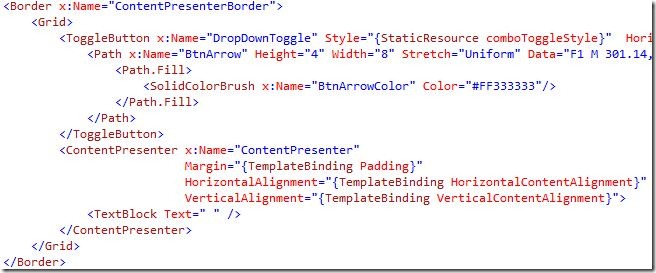
比DataPager幸运的是,我们可以直接取得ContentPresenter的引用了,由于和DataPager单纯的添加元素不同,为ComboBox添加一个SelectionItemTemplate之前,我们还至少要看看为什么ItemTemplate会作用到SelectedItem上的,打开Reflector查看ComboBox的相关代码,毫无疑问直奔主题找到ComboBox的OnSelectionChanged:
1: internal override void OnSelectionChanged
(int oldIndex, int newIndex, object oldValue, object newValue)
2: {
3: if (this.IsDropDownOpen)
4: {
5: if (newIndex != -1)
6: {
7: base.SetFocusedItem(newIndex, true);
8: }
9: }
10: else if (this.ElementContentPresenter != null)
11: {
12: this.SetContentPresenter(newIndex);
13: }
14: }
顺藤摸瓜,找到SetContentPresenter,由于在ControlTemplate中我们看到Selection的呈现者就是ContentPresenter,基本可以判定SetContentPresenter就是关键所在:
1: private void SetContentPresenter(int index)
2: {
3: if (this._swappedOutComboBoxItem != null)
4: {
5: object content = null;
6: if (this.ElementContentPresenter != null)
7: {
8: content = this.ElementContentPresenter.Content;
9: this.ElementContentPresenter.Content = null;
10: }
11: this._swappedOutComboBoxItem.Content = content;
12: this._swappedOutComboBoxItem = null;
13: }
14: if (index == -1)
15: {
16: if (this.ElementContentPresenter != null)
17: {
18: this.ElementContentPresenter.Content = this._emptyContent;
19: this.ElementContentPresenter.ContentTemplate = null;
20: }
21: this.SelectionBoxItem = null;
22: this.SelectionBoxItemTemplate = null;
23: }
24: else
25: {
26: if (this.ElementContentPresenter != null)
27: {
28: this.ElementContentPresenter.Content = null;
29: }
30: bool isNewlyRealized = false;
31: ComboBoxItem container = (ComboBoxItem)
base.ItemContainerGenerator.ContainerFromIndex(index);
32: if (container == null)
33: {
34: GeneratorPosition position =
base.ItemContainerGenerator.GeneratorPositionFromIndex(index);
35: using (base.IItemContainerGenerator.StartAt(position,
GeneratorDirection.Forward, true))
36: {
37: container = (ComboBoxItem) base.IItemContainerGenerator.
GenerateNext(out isNewlyRealized);
38: }
39: }
40: if (isNewlyRealized)
41: {
42: this._preparingContentPresentersElement = true;
43: base.IItemContainerGenerator.PrepareItemContainer(container);
44: this._preparingContentPresentersElement = false;
45: }
46: object obj3 = container.Content;
47: if (obj3 is UIElement)
48: {
49: container.Content = null;
50: this._swappedOutComboBoxItem = container;
51: }
52: container.IsMouseOver = false;
53: container.ChangeVisualState();
54: DataTemplate contentTemplate = container.ContentTemplate;
55: if (this.ElementContentPresenter != null)
56: {
57: this.ElementContentPresenter.ContentTemplate = contentTemplate;
58: this.ElementContentPresenter.Content = obj3;
59: }
60: this.SelectionBoxItem = obj3;
61: this.SelectionBoxItemTemplate = contentTemplate;
62: }
63: }
(这里的最后两行按照字面意思应该就是与我们所要实现的SelectionItemTemplate一样的效果,不过我没有发现其他地方有这2个变量的地方,而且它们也被简单设置成了obj3和contentTemplate)
代码比较长,不过大部分可以不管,仅看46行开始的代码。obj3表示我们绑定到ComboBox的ItemsSource中的数据项,contentTemplate表示了我们设置的ComboBox的ItemTemplate(假如有的话),如果我们直接提供了ComboBoxItem的派生类作为数据源则参考46行代码以前的处理,ElementContentPresenter表示我们在一开始处ComboBox的ControlTemplate中找到的ContentPresenter,即选中项的呈现者。相关代码可在OnApplyTemplate中找到。
1: this.ElementContentPresenter = base.GetTemplateChild("ContentPresenter") as ContentPresenter;
至此,所有的准备工作都已经完成,为了实现SelectionItemTemplate,我们只要阻止57行代码的执行,或者说是使之无效。阻止执行显然是不科学的,因此我们的办法就是监视ElementContentPresenter的ContentTemplate属性,但它发生改变的时候,马上强制替换成我们的SelectionItemTemplate,从而达到与ItemTemplate不一致的效果。有了前面的准备,实现此效果出乎意料的简单,首先定义SelectionItemTemplate属性:
1: private static DependencyProperty SelectionItemTemplateProperty =
DependencyProperty.Register("SelectionItemTemplate", typeof(DataTemplate),
typeof(SpecialSelectionComboBox), null);
2:
3: public DataTemplate SelectionItemTemplate
4: {
5: get
6: {
7: return (DataTemplate)base.GetValue(SelectionItemTemplateProperty);
8: }
9: set
10: {
11: base.SetValue(SelectionItemTemplateProperty, value);
12: }
13: }
然后在OnApplyTemplate中获得选中项的呈现者,并检测它的ContentTemplate变化:
1: public override void OnApplyTemplate()
2: {
3: base.OnApplyTemplate();
4:
5: _ContentPresenter = (ContentPresenter)GetTemplateChild( "ContentPresenter");
6:
7: _Watcher.Attach(_ContentPresenter, "ContentTemplate", SelectionContentTemplateChanged);
8: }
当ContentTemplate发生变化时,强制设置为我们的SelectionItemTemplate:
1: private void SelectionContentTemplateChanged(object value)
2: {
3: if (value != SelectionItemTemplate && value != null)
4: {
5: _ContentPresenter.ContentTemplate = SelectionItemTemplate;
6: }
7: }
这里有个需要注意的地方,value != null这个条件很容易被忽视,当ComboBox没有选中任何项时,_ContentPresenter的ContentTemplate应该让其保持为null,因为此刻_ContentPresenter的Content属性也为null,事实上这个时候_ContentPresenter会把它自己的DataContext作为数据源,如果这个时候也强制把模版设置为SelectionItemTemplate,则可能会出现一些意外的效果,比如我们使用了这样一个SelectionItemTemplate:
1: <DataTemplate>
2: <TextBlock Text={Binding Name} />
3: </DataTemplate>
而正好ComboBox的父控件层级中有一个设置了DataContext,于是ComboBox的DataContext也使用了这一值,而DataContext对象正好有一个Name的属性,那么在ComboBox没有选中任何项时,会看到SelectionItemTemplate呈现出DataContext的Name。
在有SelectionItemTemplate之后我们来试着用它实现一个简单的树状结构ComboBox,先定义一个类,常见的如产品分类:
1: public class ProductCategory
2: {
3: public string Name { get; set; }
4: public int Level { get; set; }
5: public string NameWithPathSymbol
6: {
7: get
8: {
9: string path = "|--";
10: for (int i = 0; i < Level - 1; ++i)
11: {
12: path = " " + path;
13: }
14:
15: return path + Name;
16: }
17: }
18: }
19:
20: public class ProductCategoryCollection : List <ProductCategory>
21: {
22: public ProductCategoryCollection()
23: {
24: Add(new ProductCategory{ Name = "电脑", Level = 1 });
25: Add(new ProductCategory{ Name = "联想", Level = 2 });
26: Add(new ProductCategory{ Name = "惠普", Level = 2 });
27: Add(new ProductCategory{ Name = "打印机", Level = 1 });
28: Add(new ProductCategory{ Name = "兄弟", Level = 2 });
29: Add(new ProductCategory{ Name = "佳能", Level = 2 });
30: }
31: }
树状的排序规则这里略过,硬编码合理的顺序。然后在xaml中使用我们刚刚完成ComboBox:
1: <Grid>
2: <Grid.Resources>
3: <local:ProductCategoryCollection x:Key="ProductCategories" />
4: </Grid.Resources>
5: <local:MyComboBox ItemsSource="{StaticResource ProductCategories}">
6: <local:MyComboBox.ItemTemplate>
7: <DataTemplate>
8: <TextBlock Text="{Binding NameWithPathSymbol}" />
9: </DataTemplate>
10: </local:MyComboBox.ItemTemplate>
11: <local:MyComobBox.SelectionItemTemplate>
12: <DataTemplate>
13: <TextBlock Text="{Binding Name}" />
14: </DataTemplate>
15: </local:MyComobBox.SelectionItemTemplate>
16: </local:MyComboBox>
17: </Grid>
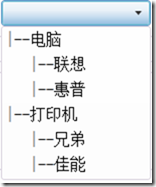
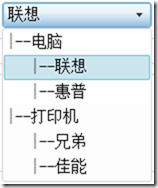
给上两张效果图,在Items列表和SelectedItem中呈现不一样的模版,“|--”的符号比较丑陋,事实上ItemTemplate中应该使用Path对象画出比较好的节点效果,不过如前面多次提到的,这不是重点,而且SelectionItemTemplate更适用的场合应该不是为了做树结构效果,这个实例只是为了展示SelectionItemTemplate的应用。
标签:
本站文章除注明转载外,均为本站原创或翻译。欢迎任何形式的转载,但请务必注明出处、不得修改原文相关链接,如果存在内容上的异议请邮件反馈至chenjj@evget.com
文章转载自:网络转载


 首页
首页 


 272次
272次
 相关文章
相关文章 

 微信
微信 在线咨询
在线咨询


 渝公网安备
50010702500608号
渝公网安备
50010702500608号

 客服热线
客服热线